This tutorial will work through a detailed breakdown for how to remove and replace the strings on a nylon string “Classical” style guitar. Everything from the tools required to the techniques needed for the string replacement will be covered.
Why is the Classical Guitar Different?
Classical guitars, (also often referred to as “Nylon String” guitars), are unique instruments to both play and to re-string. The nylon guitar strings require special knots tied at both the tuners and at the bridge. That is why the classical strings do not have a typical “ball end” as with electric and steel-string acoustic guitar strings.
Since the Classical strings are so different, there are some important details to become aware of with the general maintenance of these instruments. Those details will be covered within this tutorial.
Which Classical Guitar Strings are the Best?
There are many different brands and models of classical guitar strings on the market. However, it takes a seasoned guitar player of the “nylon guitar string” world to form their personal opinion of “the best” strings.
Most guitarists won’t be able to tell much of a difference between the different string brands, the string types. Therefore, within this article, the recommended type will be the most common string type for Introductory and Intermediate guitar players, which is the, “Normal Tension.”
Personal String Recommendation:
The Classical strings that I have recommended for many years to my own personal students are the, “D’Addario EJ30 Classics Rectified Classical Guitar Strings, Normal Tension.” As each guitarists playing skill increases a guitar player may wish to increase the string tension (Moderate and Hard tension strings), for a brighter guitar tone.
IMPORTANT:
The most important thing to keep in mind about Classical guitars is that classical guitar strings must always be used. Never attempt to attach electric guitar steel strings (or regular acoustic strings) onto a Classical style guitar.
The tension from the steel guitar strings is much higher. The added tension will place too much stress upon the guitar’s neck and bridge. Classical guitars are not built to handle that much tension. Attaching anything except nylon strings on a Classical will most certainly damage the Classical guitar.
Also, it is important to keep in mind that steel strings have ball-ends, (a steel ball attached on the end of the strings). Classical guitar strings do not have ball-ends, so they require a knot. Never purchase or try and attach any steel string with a ball-end onto your Classical guitar.
1). String Removal
Start by fully loosening the tension off of each string. It is suggested to begin with the lowest sounding string (6th string, Low E). Once the strings have been removed, clean both the frets and the fingerboard with .0000 (Super-Fine) steel wool and then apply a light coat of organic almond oil to the fingerboard to preserve the wood.
2). Installation of the new strings
You will find that with a few of the wound strings one end of the string will have a different texture, (a looser /wider string wrap). This end is for at the tuning key, NOT the bridge. Use only the consistent (tighter wound) end of the new string at the bridge.
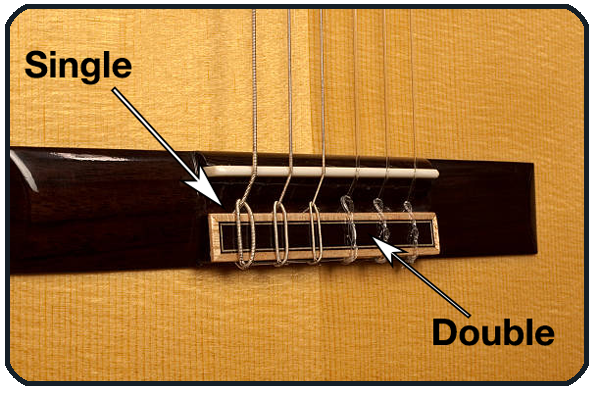
BRIDGE WRAP: Put the end of the string through the hole in the bridge. Bring the tail up and around the main length of the string. You can make a crease in the string to mark your place if you like. Tuck the tail of the string under the loop that you just created.
On the “low E” (6th) string, the “A” string (5th), as well as the, “D” string (4th), you will only need to tuck the string under once (single tuck) at the bridge for the tie-wrap. For the other remaining strings, you’ll need to wrap them through twice (double tuck). See the image below…

NOTE: When installing Hard Tension nylon strings it is often necessary to tie a “TRIPLE” knot on the high “E” (1st string) to prevent the high “E” from slipping under normal tuning tension.
TUNER WRAP:
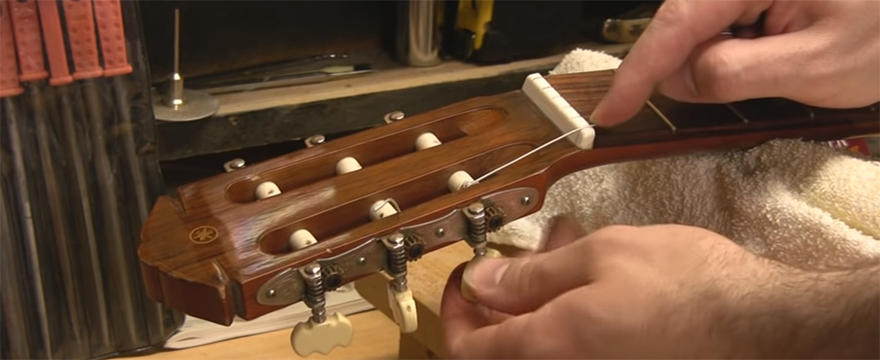
Run the string through the hole in the middle of the tuning post. Pull the string all the way through until it becomes tight and then back-off on the string (approx. 2 to 3 inches), to create slack. The extra string slack will be what gets wrapped around the tuner post.
Tuck the end of the string around the length of the string to hold it firm. Point the tail-end of the string towards the guitar body and begin tightening the string around the tuner post, (a string winder tool can be handy at this point). Be sure that the string wraps onto the post without any overlap.
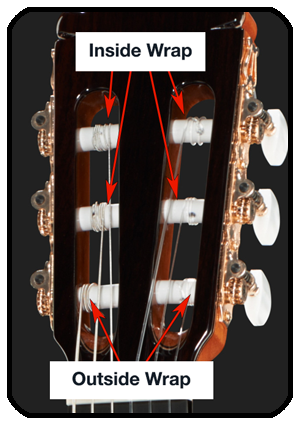
Wind the 6th and the 1st strings to the outside of the head-stock and wind the 2nd through 5th strings into the center of the head-stock, (see image below). Tighten the tuner for the string until it begins reaching into correct pitch.

CONCLUSION:
Expect to be doing frequent tuning for the first several days to a week after installing the new set of nylon strings. This is natural, as the plastic in the nylon will want to stretch and repeated tuning comes with the territory. Be patient, once everything settles, you’ll enjoy a much nicer sound.
Watch the related “How to Change Strings on a Classical Guitar” video for more detail and for further understanding of how to perform some of the general cleaning and maintenance steps when changing nylon strings.
